はじめに
前回の記事の続きです。
メーター読み取りを実装する前に、画像処理のパラメータを動的に調整できるようにしておこうと思います。
cpp-httplib を使えば、HTTPサーバーをローカルで起動して、ブラウザやcurlからパラメータをクエリパラメータで指定し、画像処理結果をリアルタイムで確認できます。
プロジェクト構成
my_opencv_project/
├── Makefile
├── include/
│   └── httplib.h
├── images/
│   └── meter.jpg
└── src/
└── main.cppcpp-httplibのインストール
cpp-httplibはヘッダーオンリーライブラリです。以下のコマンドでGitHubからダウンロードして include/ ディレクトリに配置します。
mkdir include
curl -Lo include/httplib.h https://raw.githubusercontent.com/yhirose/cpp-httplib/refs/heads/master/httplib.hmain.cpp の作成
#include "../include/httplib.h"
#include <opencv2/opencv.hpp>
#include <iostream>
#include <sstream>
int main()
{
httplib::Server svr;
// Cannyエッジ検出エンドポイント
svr.Get("/api/edge", [](const httplib::Request& req, httplib::Response& res) {
cv::Mat img = cv::imread("images/meter.jpg");
if (img.empty()) {
res.set_content("Image not found", "text/plain");
return;
}
// クエリパラメータから閾値を取得
int threshold1 = 50; // デフォルト値
int threshold2 = 150; // デフォルト値
if (req.has_param("th1")) {
threshold1 = std::stoi(req.get_param_value("th1"));
}
if (req.has_param("th2")) {
threshold2 = std::stoi(req.get_param_value("th2"));
}
// グレースケール変換
cv::Mat gray;
cv::cvtColor(img, gray, cv::COLOR_BGR2GRAY);
// Cannyエッジ検出
cv::Mat edges;
cv::Canny(gray, edges, threshold1, threshold2);
// PNG形式で出力
std::vector<uchar> buf;
cv::imencode(".png", edges, buf);
std::string body(buf.begin(), buf.end());
res.set_content(body, "image/png");
});
// 2値化エンドポイント
svr.Get("/api/threshold", [](const httplib::Request& req, httplib::Response& res) {
cv::Mat img = cv::imread("images/meter.jpg");
if (img.empty()) {
res.set_content("Image not found", "text/plain");
return;
}
// クエリパラメータから閾値を取得
int threshold_val = 128; // デフォルト値
if (req.has_param("val")) {
threshold_val = std::stoi(req.get_param_value("val"));
}
// グレースケール変換
cv::Mat gray;
cv::cvtColor(img, gray, cv::COLOR_BGR2GRAY);
// 2値化
cv::Mat binary;
cv::threshold(gray, binary, threshold_val, 255, cv::THRESH_BINARY);
// PNG形式で出力
std::vector<uchar> buf;
cv::imencode(".png", binary, buf);
std::string body(buf.begin(), buf.end());
res.set_content(body, "image/png");
});
// HTML UI
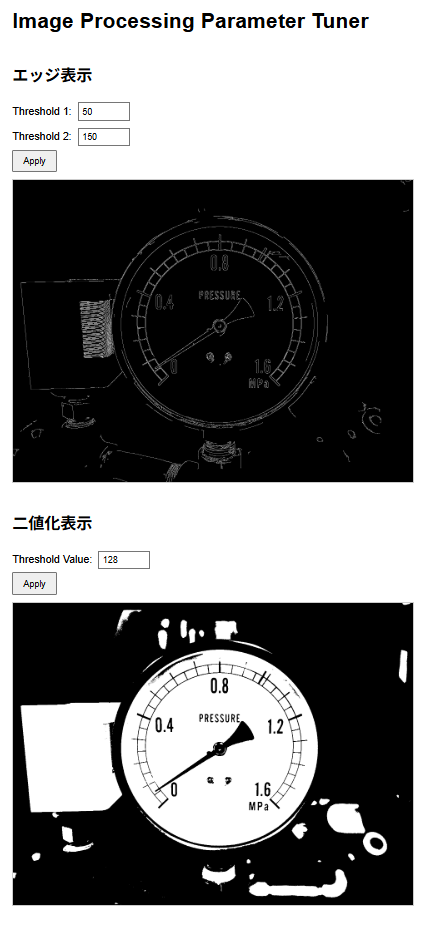
svr.Get("/", [](const httplib::Request&, httplib::Response& res) {
std::string html = R"html(
<!DOCTYPE html>
<html>
<head>
<title>Image Processing Parameter Tuner</title>
<style>
body { font-family: Arial; margin: 20px; }
.control {
margin: 20px 0;
display: flex;
flex-direction: column;
align-items: flex-start;
}
.control-inputs {
margin-bottom: 15px;
}
input { margin: 5px; padding: 5px; }
button { padding: 8px 15px; cursor: pointer; }
img { max-width: 600px; border: 1px solid #ccc; margin-top: 10px; }
</style>
<meta charset="UTF-8">
</head>
<body>
<h1>Image Processing Parameter Tuner</h1>
<div class="control">
<h2>エッジ表示</h2>
<label>Threshold 1: <input type="number" id="th1" value="50" min="0" max="255"></label>
<label>Threshold 2: <input type="number" id="th2" value="150" min="0" max="255"></label>
<button onclick="updateEdge()">Apply</button>
<img id="edgeImg" src="/api/edge?th1=50&th2=150" alt="Edge Detection">
</div>
<div class="control">
<h2>二値化表示</h2>
<label>Threshold Value: <input type="number" id="val" value="128" min="0" max="255"></label>
<button onclick="updateThreshold()">Apply</button>
<img id="threshImg" src="/api/threshold?val=128" alt="Binary Threshold">
</div>
<script>
function updateEdge() {
const th1 = document.getElementById("th1").value;
const th2 = document.getElementById("th2").value;
document.getElementById("edgeImg").src = "/api/edge?th1=" + th1 + "&th2=" + th2 + "&t=" + Date.now();
}
function updateThreshold() {
const val = document.getElementById("val").value;
document.getElementById("threshImg").src = "/api/threshold?val=" + val + "&t=" + Date.now();
}
</script>
</body>
</html>
)html";
res.set_content(html, "text/html");
});
std::cout << "Server listening on http://localhost:8080" << std::endl;
svr.listen("0.0.0.0", 8080);
return 0;
}ビルドと実行
make build
./build/main使用方法
http://localhost:8080をブラウザで開く- UIでパラメータを調整して「Apply」ボタンをクリック
- 画像が更新される
まとめ
今回は画像処理のパラメータを動的に調整できるHTTPサーバーをC++で実装しました。
次回はこのサーバーを使って、メーター読み取りのアルゴリズムを実装していきます。
コメント